Living in a small mountain village just outside of Tokyo, I grow a crop of indigo every year and process the leaves into dye using traditional methods. I also breed silk moths, raise the silkworms and then reel/spin the silk from the cocoons. The silk is then dyed with natural dyes and finally woven on traditional Japanese looms. I run several ten-day live-in workshops a year at the old farmhouse here in Japan focusing on the Japanese use of indigo. Contact me for information.
Tuesday, 14 February 2012
More on Sarasa Vegetable Pigment Making Techniques
Madder Plants
Boiled madder roots. Note that the outside skin of the root is pigment rich not the tough sinewy inner core.
Madder pigment settling to the bottom. Repeat this several times to neutralize the dye bath.
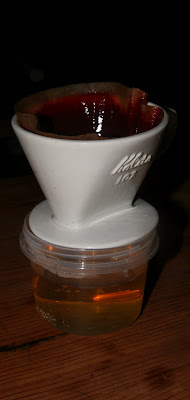
Filtering the sediment with a coffee filter.
The final madder dye pigment ready to be refrigerated.
Madder, akane '茜' is the root that produces alizarin http://en.wikipedia.org/wiki/Alizarin the only completely light fast and stable red dye. Every brilliant red color on cloth found anywhere in the world through out history up until 1860ish was made from this root. Think of deep red Turkish and Persian carpets, Indian print cloth, red colored tartans etc. The Japanese version grows wildly around Fujino.
Here is the wiki link for a quick read on madder. http://en.wikipedia.org/wiki/Rubia
Keeping it short...bring to a boil 100 grams of the roots in 2 liters of water, turn down the heat and simmer for twenty minutes. Remove the roots and filter the dye liquid through a medium mesh. Repeat the boil with another 2 liters of water. The roots can be used again and again to get paler shaded of pink on silk and wool. Making an extract you want the real dark stuff from the initial two boils.
Combine the two dye baths from the first and second boil. Add 10 grams of creme of tarter or the equivalent amount of aluminum mordant. The pH will be around 3. Use full spectrum pH paper to test. To neutralize the pH to 7 pour in ash alkaline until the mixture clouds up. (Creme of Tarter naturally clouds up when neutralized.) Pour the mixture into jars and let settle. Madder settles in about an hour. Remove the clear liquid and add more water to make sure the mixture is pure and neutralized. Repeat this three to four times.
Finally remove the clear water and pour the sediment into a coffee filter. You want the paste left in the filter. Scoop this out and put it in jar and keep refrigerated, It should keep for months if not years. This red pigment can be used as a stable paint with some binder on cloth or paper wood etc.
Madder has a long history and there are more than a few ways to extract the dye to get clear and deep colors. Another blog.
Sorry I was so cheap with lifted photos of sarasa on yesterday's blog. Here are a few from the kitchen today.
Left: Onion skins and cochineal. Middle: madder. Right (Yamaguchi san cut this stencil): combination. These are not finished yet. When it gets warmer they will get a background or accent color of indigo.
Monday, 13 February 2012
Monday Sarasa Research
Jars of settling cochineal purple dye.
Pomegranate skins ready to have the pigment extracted.
Cedar ash to make the alkaline solution.
There is a field/mountain of Japanese textiles that seemed just too difficult to run into. The bunny hill even seemed intimidating. There just isn't that much information out there either. So on Mondays these past few months Eri and I have been experimenting with making vegetable dye extracts and fixing them on cotton and linen. Our goal is to figure out how to make a vegetable pigment paste from the dyestuffs available in the area to use with a brush and use with Japanese stencil dying techniques. We will repeat the procedures enough that we are comfortable with them and can work with a dozen or so useful dyes. We have a stack of old books written in Japanese which individually nibble away at the different overlapping and confusing techniques. Going through stacks of actual antique materials we are very slowly figuring out which techniques were mixed and used with each type of cloth. Instinctively we are maneuvering through these to find what cloth we would like to make ourselves. We have pulled off a few lucky minor masterpieces already. Smells like beginner's luck.
The topic of sarasa itself is a tough nut to crack in Japan. The techniques came to life in some obscure corner of India in the 13th century. Fixing color on the surface of cotton with woodblock mordant stamping, metal stamp beeswax resist. cut out stencil dyes used with a paste resist and/or as a positive stencil, hand painted and endless combinations of techniques mixed with endless varieties of vegetable, animal and rock pigments. The cloth was imported to Japan in the 15th century on Portuguese ships. It spread and was both valued and despised for the foreign aesthetic brought with it. And the genius of Japanese adaption, refinement and technical improvement took off.
The authoritative reference books we got our paws on are often contradictory and not written by practicing artisans. Often edited/written by someone smelling a tad nationalistic and unable to place the techniques on a larger horizon and decipher them historically, aesthetically and technically. Great information is out there somewhere but for the time being it is better to swim around in the unknown and let a few bottom weeds tangle our ankles and cause some panic. Classrooms and detailed 'how to' books seem to deaden the actual work. The time will come to polish up what we learn but now is the time to run with the potential of each color and technique as we discover it. This is the dilemma of teaching. How to show just enough technique to create enthusiasm and have the students play and discover for themselves.
First the cloth has to be impregnated with a protein from soy beans. Then the cloth should be impregnated with a mordant. So far we have just used creme of tartar and aluminum. It won't be long before we will move onto woodblock and metal stamps meaning more experiments with iron and copper. Working with tannin heavy barks and nuts will also be necessary to get at the potentials of these techniques.
The extract method varies slightly for each dyestuff. Most require an alkaline solution made from wood ash. Take some wood ash and pour on boiling water and strain it. Let the sediment settle for two days and take off the clear water on the top. This ash alkaline solution is necessary as both a mordant (naturally occurring aluminium) and acts to help draw out the pigment and make it soluble.
So far we have made pastes from onion skins, cochineal, pomegranate skins, madder, suo, gardenia pods and cedar bark. You usually end up with a pigment mud the consistency of a rubbery toothpaste.
Basically you are making a paint that needs a binding agent to the cloth. Hide or bone marrow glue is the easiest and most direct method. The cloth ends up being stiff. Not the best for clothing. Strong mordant with a protein isn't as color fast but the cloth remains soft.
I will keep you updated as the experiments go forward and share insights and techniques.
A few images taken from the Internet.